Furniture Flip Win: My Green Dry Sink Sold in Record Time!
This has to be one of my favorite furniture flips of all time. I scored this antique dry sink at an estate sale for just $12 — talk about a bargain! The condition was a little rough around the edges, but the piece itself was solid wood and full of character. My goal was to save as much of the beautiful original wood as possible (and yes, I know some people think painting antique wood is a crime… but sometimes you’ve got to do what the project demands). Unfortunately, a few cracks and dents meant some filling and repairs were unavoidable. That’s when inspiration struck: this dry sink was destined for a bold makeover in a rich, stunning shade of green.
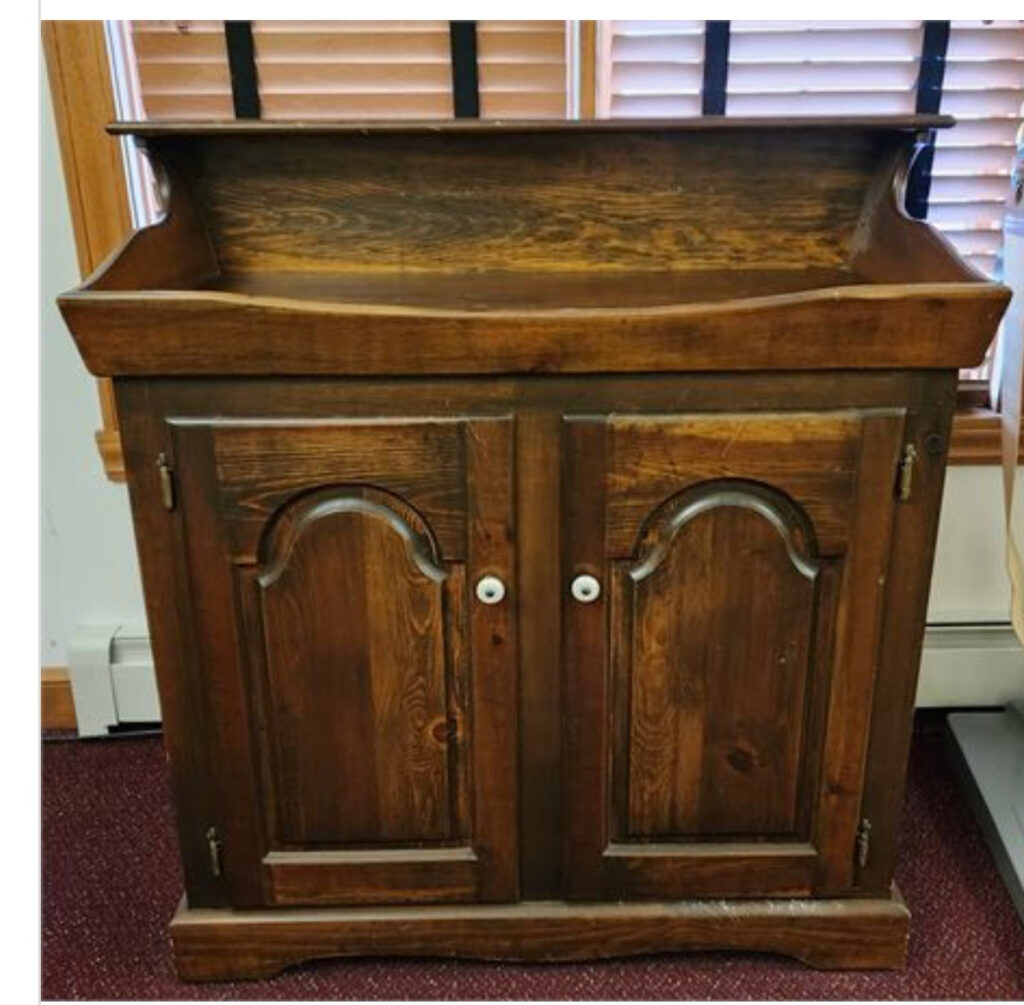
As you can see in the before photo, the wood on this dry sink was absolutely gorgeous. My goal from the start was to preserve as much of it as possible, but both sides had some pretty serious cracks — honestly, one of the biggest repair challenges I’ve tackled so far.
I started off by giving the whole piece a deep clean. My go-to is a simple vinegar and water mix because my inner hippie avoids chemicals whenever possible. Once it was clean, I focused on the top and doors, which I wanted to leave natural. To strip away the old, cracking finish, I grabbed my trusty carbide scraper. If you’ve never used one, put it on your must-have list for furniture flips. It takes some elbow grease, but it’s way less messy than sanding — and unlike a sander, it won’t chew too deep into the wood (been there, done that!).
Next, I filled the cracks and dents in the body with Minwax Color-Changing Wood Filler. Once it dried, I lightly sanded everything smooth and gave the whole piece another quick wipe down. At that point, it was prepped and ready for the fun part: paint!
Painting & FinishingI wish I could tell you the exact paint color I used — but that’s part of the magic of my frugal flipping hack:
- Sherwin-Williams Mistint Paints (a.k.a. mistake paints): These are cans that customers reject because the color didn’t turn out quite as expected. They get deeply discounted — I’m talking $75–$125 paint for under $10 a can. Prices vary by store, but I almost hate to share this secret because I don’t want the shelves cleared before I get there!
- Custom Colors from My Stash: Over time I’ve built a whole collection of mistint paints. I mix and match them to create custom colors, and I also whip up my own chalk paint and all-in-one paint (post coming soon with recipes!). Honestly? I’ve tried the pricey chalk paints, and I still prefer my homemade version.
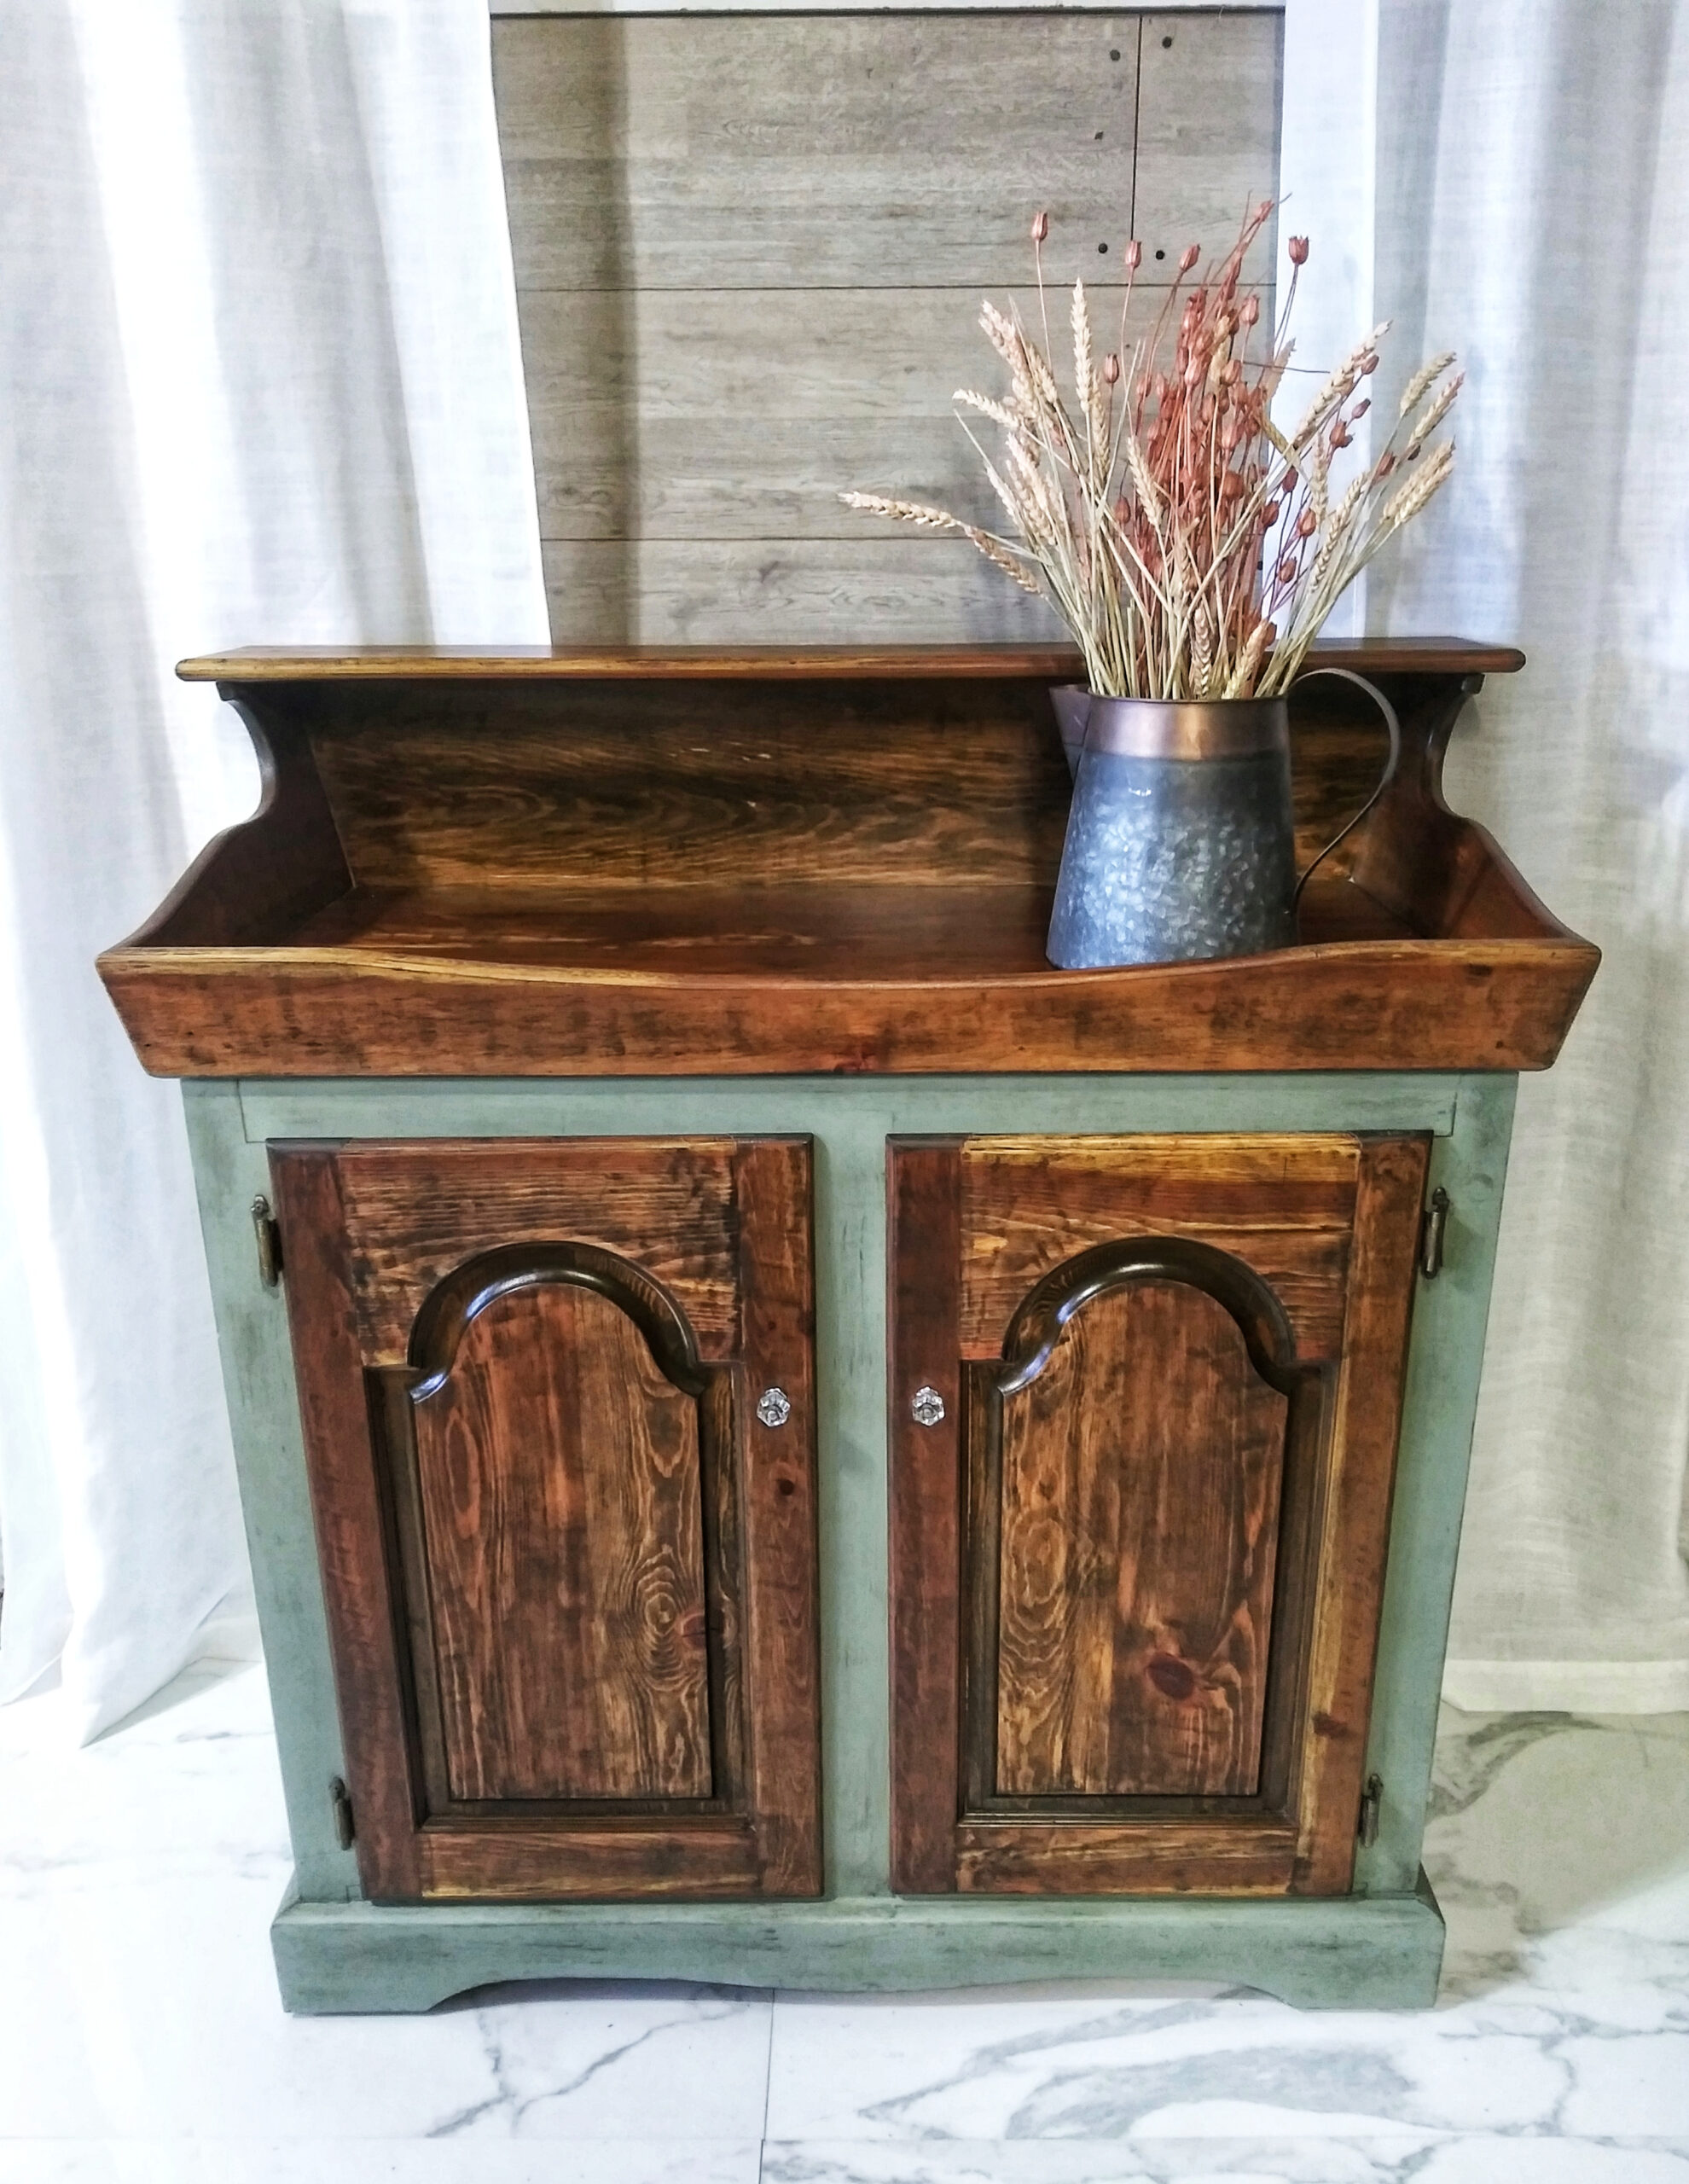
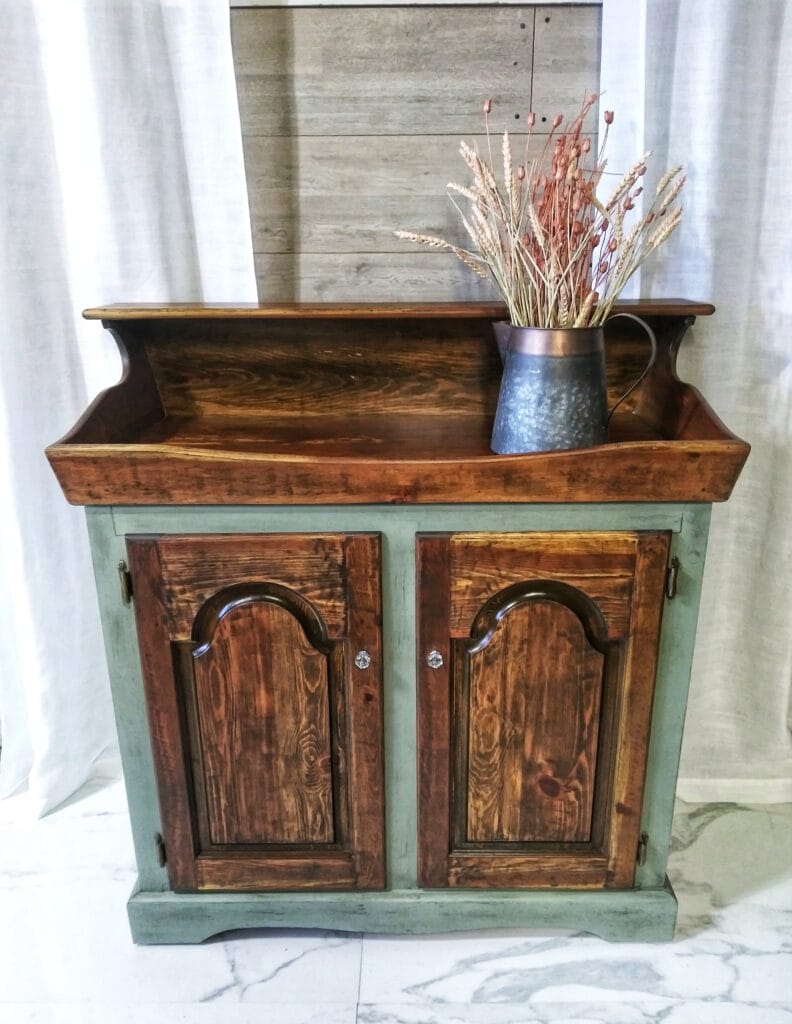
- The Green Transformation: For this dry sink, I brushed on two coats of a custom green. Once dry, I glazed over it with a bit of Valspar Antiquing Glaze, applied lightly with cheesecloth to add depth and character.
- Sealing It All In: To finish, I used two coats of Minwax Polycrylic. I’m still on the hunt for a frugal alternative, but this product is worth the splurge — it goes on smooth, protects beautifully, and a little can stretches through multiple projects.
Finishing Touches: Making That Wood Glow Again
- Howard Restor-A-Finish (Walnut): For the top and doors, I used this miracle product. A little goes a long way, and it’s seriously as easy as wiping it on. No complicated steps, no stress — it’s basically foolproof!
- Howard Feed-N-Wax: Once the Restor-A-Finish dried, I polished everything up with Feed-N-Wax. This step added that rich, warm glow that makes the wood look alive again.
- Crystal Knobs for Charm: I swapped out the old wooden knobs for some darling crystal ones from my stash. They added the perfect touch of sparkle and personality — as if this beauty needed any more character!
And just like that, she was finished! What started as a cracked, tired antique turned into a show-stopping piece with a glowing wood finish, a bold green body, and sparkling hardware. Honestly, this dry sink didn’t just get a makeover — it got a whole new life. No wonder it sold within an hour of hitting the sales floor!
Final Thoughts
This dry sink makeover reminded me why I love flipping furniture so much — taking something worn, cracked, and forgotten and turning it into a fresh, one-of-a-kind piece. With a little repair work, a bold coat of paint, and some love for the original wood, this flip went from outdated to irresistible (and sold in just one hour!).
If you’ve been thinking about tackling your own furniture project, I say go for it! Start small, experiment with colors, and don’t be afraid to mix in some frugal hacks along the way.
Have you ever flipped a piece that surprised you with how well it turned out? Share your story in the comments — I’d love to hear about your projects! And don’t forget to pin this post for later if you’re looking for inspiration on your next DIY furniture makeover.